Generate transaction statements
You can generate a transaction statement with the API. You can also download transaction statements, referred to as transaction confirmations, from your Dashboard.
- The account member has the
canViewAccountmembership permission. - You have a project access token.
- The transaction status is
Booked. - Subscribe to the
TransactionStatement.Generatedwebhook.
Supported transaction types
Transaction confirmation statements are only available for incoming and outgoing SEPA Credit Transfers (regular and instant) and International Credit Transfers with the status Booked.
Transaction confirmation statements are not available for card transactions, SEPA Direct Debit transactions (SDD In or SDD Out), fee transactions, or any other transaction types not explicitly listed above.
For a comprehensive statement including all transaction types and fees, see account statements.
API guide
Step 1: Generate statement
- Call the
generateTransactionStatementmutation. - Add the
transactionId. - Choose the language for your transaction statement.
- Add the success payload and any information you need, such as the transaction statement ID and status.
- Add rejections (not shown).
mutation TransactionStatement {
  generateTransactionStatement(
    input: {
      transactionId: "$TRANSACTION_ID"
      language: es
    }
  ) {
    ... on GenerateTransactionStatementSuccessPayload {
      __typename
      transactionStatement {
        createdAt
        id
        statusInfo {
          status
          ... on PendingTransactionStatementStatusInfo {
            __typename
            status
        }
      }
    }
  }
}
Step 2: Get transaction statement ID
Get the transactionStatement > id from the success payload (line 7).
This is the only way to get the transactionStatement > id.
Copy it immediately to use in step 3.
{
  "data": {
    "generateTransactionStatement": {
      "__typename": "GenerateTransactionStatementSuccessPayload",
      "transactionStatement": {
        "createdAt": "2024-09-26T15:31:38.742Z",
        "id": "$TRANSACTION_STATEMENT_ID",
        "statusInfo": {
          "status": "Pending",
          "__typename": "PendingTransactionStatementStatusInfo"
        }
      }
    }
  }
}
Step 3: Retrieve download URL
After generating the transaction statement, you receive a TransactionStatement.Generated webhook notification letting you know the statement can be downloaded by URL.
The URL is valid for seven days.
- Call the
transactionStatementquery. - Add the
transactionStatement>id. - Add
statusInfofor all statuses. The URL to download the statement is provided instatusInfo>GeneratedTransactionStatementStatusInfo>url(line 11).
query GetStatementUrl {
  transactionStatement(id: "$TRANSACTION_STATEMENT_ID") {
    createdAt
    updatedAt
    statusInfo {
      status
      ... on GeneratedTransactionStatementStatusInfo {
        __typename
        expiresAt
        status
        url
      }
    }
  }
}
Step 4: Download statement
Use the url to download the statement within seven days of generation.
- Copy the
urlfrom the payload (line 10). - Paste the
urlinto your preferred browser. - The document downloads automatically after you press enter.
{
  "data": {
    "transactionStatement": {
      "createdAt": "2024-09-26T16:08:55.512Z",
      "updatedAt": "2024-09-26T16:08:55.512Z",
      "statusInfo": {
        "status": "Generated",
        "__typename": "GeneratedTransactionStatementStatusInfo",
        "expiresAt": "2024-10-03T16:09:01.286Z",
        "url": "$YOUR_DOWNLOAD_URL"
      }
    }
  }
}
If the transaction statement status is Failed or Expired, return to step 1 to generate your statement again.
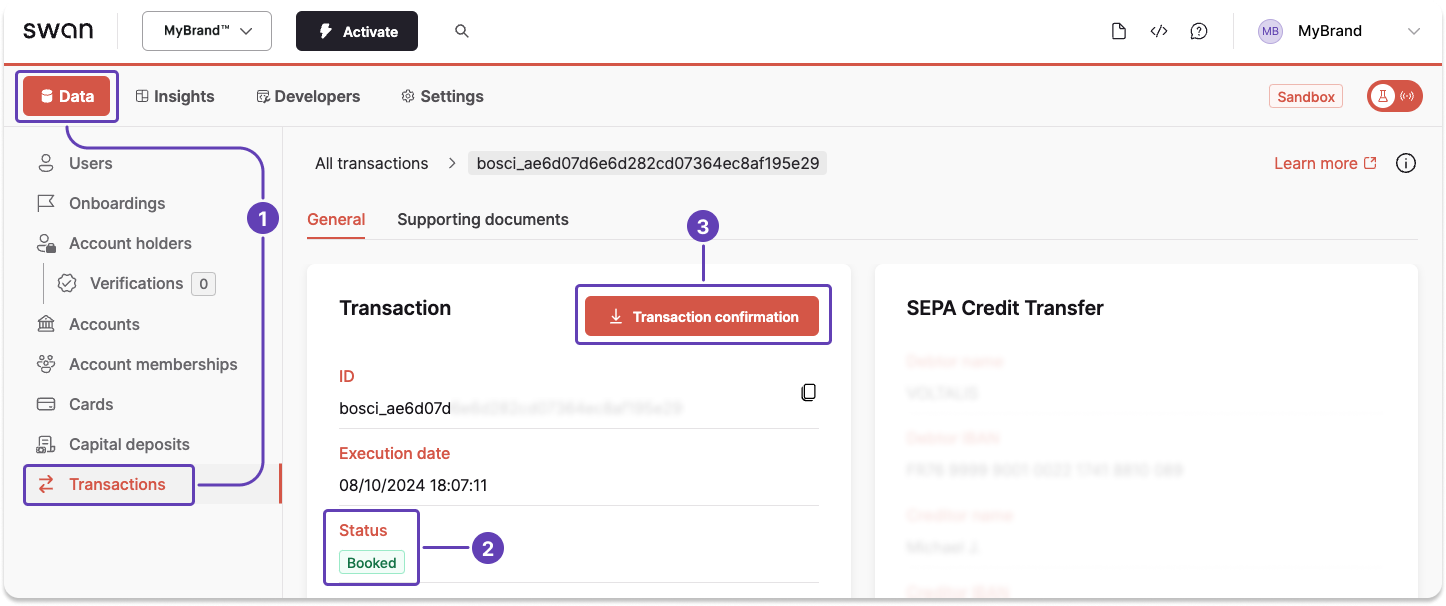
Dashboard
- On your Dashboard, go to Data > Transactions.
- Open the eligible transaction for which you'd like to download an account confirmation statement (not shown). The transaction status must be
Booked. - Click Transaction confirmation, triggering the generation and download of the document automatically.
Transaction confirmation statements are only available for incoming and outgoing SEPA Credit Transfers, Instant SEPA Credit Transfers, and International Credit Transfers with the status Booked.
The transaction confirmation button doesn't appear for ineligible transactions.
Transaction confirmation statements are different from account statements, which include all booked transactions.