Create a company onboarding link
There are two methods you can use to create company onboarding links.
- Run an API mutation to create a unique onboarding link for each future company account holder. Use this method for hybrid onboarding too, where you create the onboarding by API and the account holder completes it in Swan's no-code interface.
- Use a public link from your Dashboard to share one onboarding link with all of your users.
With the current onboarding API, the onboardingUrl is only returned in the create or update mutation response when the Public links toggle is enabled. If you create onboardings with the API and let your users complete them through Swan's onboarding form, enable this toggle before going live. You can find it under Settings > Onboarding in the Onboarding links section.
Use public links with caution. Those with fraudulent intent can use these public links to complete multiple onboardings, and if this happens undetected, they'll have multiple accounts in your project.
Unique links using the API
Create a unique company onboarding link for each user with the API.
- Call the
createCompanyAccountHolderOnboardingmutation. - Enter information for all required API fields for the account country, as noted in country requirements for company accounts.
- Start with
accountInfo(account country and optional name). - Add
accountAdmindetails (email, language, type of representation). - Add the
companyobject with business details andrelatedIndividuals.
- Start with
- Include optional fields as needed for your use case (such as
accountInfo.nameoroAuthRedirectParameters). - Add optional messages to the success payload, either for validation or in case of rejection.
The previous onboardCompanyAccountHolder mutation is deprecated.
Onboarding API v1 is deprecated. After 30 September 2026, you can't create new v1 onboardings.
Deprecated v1 queries and mutations stay available until 31 December 2026, so you can finish any v1 onboarding started before 30 September 2026.
Use createCompanyAccountHolderOnboarding for all new integrations.
For companies in France, use the companyInfoRegistryData query with the company's registration number to retrieve data from the National Business Register (RNE). Pass the results to the mutation to pre-fill company fields.
Mutation
Open in API Explorermutation CreateCompanyOnboarding {
createCompanyAccountHolderOnboarding(
input: {
accountInfo: {
country: ESP
}
accountAdmin: {
email: "alberto.moreno@mimarca.io"
preferredLanguage: es
typeOfRepresentation: LegalRepresentative
}
company: {
name: "MiMarca"
businessActivity: Construction
businessActivityDescription: "Historical restoration"
registrationNumber: "123456789"
monthlyPaymentVolume: Between10000And50000
address: {
addressLine1: "21 Barrio de San Roque"
city: "Barcelona"
country: "ESP"
postalCode: "08005"
}
taxIdentificationNumber: "Y1234567Z"
relatedIndividuals: {
type: LegalRepresentativeAndUltimateBeneficialOwner
firstName: "Sofia"
lastName: "Ramos"
sex: Female
birthInfo: {
birthDate: "1990-03-03"
country: "ESP"
city: "Madrid"
}
address: {
addressLine1: "1 Camino del Oceano"
city: "Barcelona"
country: "ESP"
postalCode: "08005"
}
ultimateBeneficialOwner: {
qualificationType: Ownership
ownership: {
type: Direct
totalPercentage: 100
}
}
}
}
}
) {
... on CreateCompanyAccountHolderOnboardingSuccessPayload {
__typename
onboarding {
id
statusInfo {
status
}
}
}
}
}
Payload
If you added validation or rejection messages, you'll see information such as the onboardingId as well as the current status Valid in the success payload.
{
  "data": {
    "createCompanyAccountHolderOnboarding": {
      "__typename": "CreateCompanyAccountHolderOnboardingSuccessPayload",
      "onboarding": {
        "id": "eda0ceec-0e20-4d1b-bbee-b3e3a4227c99",
        "statusInfo": {
          "status": "Valid"
        }
      }
    }
  }
}
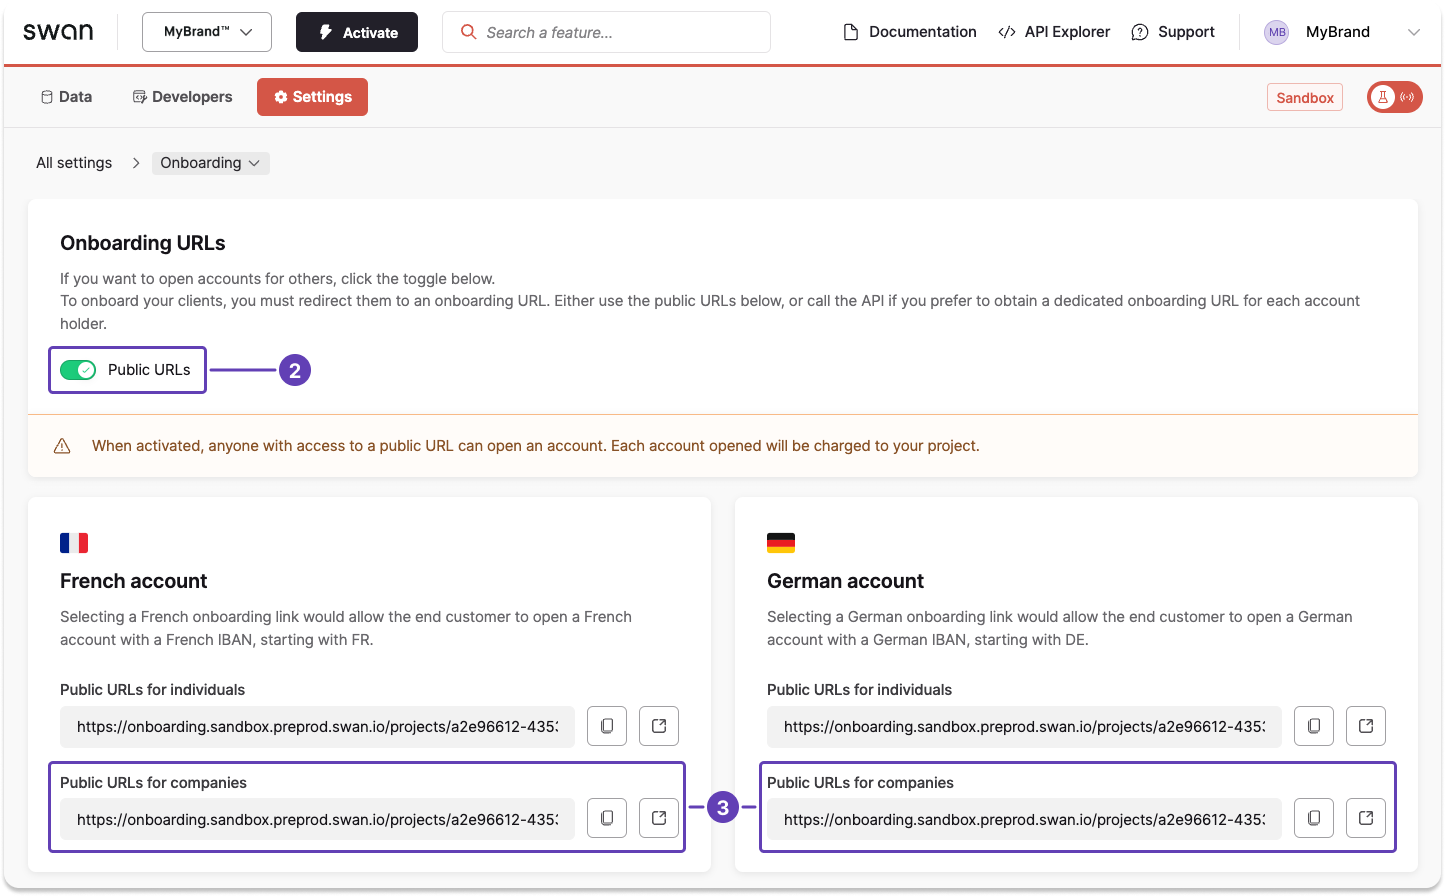
Public link using the Dashboard
- On your Swan Dashboard, go to Settings > Onboarding.
- In the Onboarding links section, toggle Public links to on.
- Notice the links that appear for individuals and companies for each account country.